Showing posts with label netting. Show all posts

Tuesday, January 4, 2011

Bead or Blog....Blog or Bead?

I'm sure every blogging beader has the same conundrum.

I'm happier while beading than I am while blogging. Particularly since prepping for a blog post means taking and editing my photos, and preparing them for uploading. And it just doesn't seem like a blog anymore without a few photos! Why is that, I wonder?  I used to be able to just yammer on about feelings or hopes and fears or, well, crap, without the need for photos rearing it's ugly head.

Time is the commodity we all have the least of. Except for teenagers, who are immortal, and thus don't feel that spending their youth courting carpal tunnel of the thumbs while texting is a waste.  I feel like I'd rather spend my valuable time where it makes me happiest.

So my blog-productivity (blogitivity? productbloggity?) is down somewhat. But on the other hand, I really like sharing my work. I like the support I get from other beaders and readers. I like the suggestions that come along when I pose a question or have a knotty problem. And beaders always have knotty problems. If ya' know what I mean.  

So there are benefits to blogging that I don't want to forego, and I know that if I want to keep readers coming back, I can't just let this blog lapse for months at a time like so many do. I can't tell you how many blogs I've stumbled across at random where the last post was in July (2009), and that one says, "Oh, I haven't posted for months but now I'm going to be posting every day..."  Yeah. Right.  

Fresh and interesting content keeps people coming around. People who will show me their stuff if I show them mine. So, we're back to photos, aren't we?

I've been struggling endlessly with my camera. I couldn't get reproducible results from one photo to another. I got the darn thing repaired (thank you, Canon USA). I couldn't believe that it wasn't easier to take a simple photo.  Online I found a recommendation that for a camera to take good jewelry photos it needs to have a Macro setting, and a white balance adjustment. My camera has those.  Why doesn't it work for me?

So I returned to state zero on my camera. I wiped out all the custom settings I'd been trying, and read the darn manual. One more time. Whattaya know?  There it is on the Macro page, when I click the little flower button, it will take pictures as close as 2 inches, or 9 inches when zoomed. Though it seems like their measurement isn't to the lens, it's the back of the camera, really.  It will focus itself. Stop struggling, Lynn. Just let the zen of the camera take over....be the picture. 

And it worked. Finally. Closeups that are beautiful, and look like the object being photographed. I had to do minimal correction of the photos in editing software. Cropping, adjusting high/lowlights, and saving in the right format. I think I only used sharpening on one photo in the whole batch!

These pictures are of my most recent piece. It's a bracelet done with a peyote strap, in size 15, yes, 15 beads. I love the "fabric" of beads this creates, so supple and with a surface of glowing depth. Then I used a ruffled netting along each edge, with 3mm Magatamas in purple to highlight the edge. 

I used a slide bar clasp in sterling, and the large beads in the fringy embellishment are flourite rounds, 12mm. I love those. This bracelet came out exactly as I wanted it to. Can you see the subtle variation in the beads on the strap? There are patterns there which, when you hold the bracelet under the light and move it, are more obvious than in the pictures. I accomplished this by using two color codes of 15s, right next to each other, Artbeads Toho 506 and 507, one of which is more blue/green/purple, and the other more green/yellow. Lovely.  I hope you can see that pattern in the pictures.

I auditioned several different methods of embellishing around the clasp, most of which didn't work. This clump of Magatamas with the flourite coming out of it is great. The larger beads flop about and clack together, so you get sound as well as sight and tactile enjoyment of the bracelet.

This piece is a variation of the last bracelet I finished, using some metallic finish size 8 delicas in what the seller called a "rain" mix. Didn't look like rain to me, but it looked nice. I made my own hook and loop closures for this one...it's only marginally successful. But as an inspiration to move into a variation that was so successful, I forgive it for not being perfect.  Sort of. Maybe I'll give it to someone I don't really like. Or convince someone to adopt it because it's so pitiful. 

In any case, with some adjustments in lighting and staging, I think I can move along in my quest for better photos now. I know it's not the camera. I probably shouldn't be taking all my pictures on a ratty beading matt with thread clippings on it, either. I have a lovely set up in the other room. 

Now I can move on to agonizing over why I don't have any Etsy sales.

Sunday, December 26, 2010

Adios to Christmas Gifts

Now I can put up photos of gifts that went out this year. I've been waiting, because I have a question about the last one.  Reading a post about the gift you're being given is the modern digital equivalent of finding your packages hidden in your mother's closet and very carefulllllly peeling off the tape to see if you can get a peek. Not that I ever did that. Mom. Really. Never.

I was amazed that these first two fit their recipients so well. My husband and son were chivvying me that they were way too small. Ha! They fit perfectly. So there. 

I made a simple peyote stitch cuff for my niece. The size 6 blue/plum beads worked up quickly, and then it cried out for some gold edging. I happened to have some huge 16mm glass beads in almost exactly the same iridescent color, so they became the double buttons. I have found I intensely dislike working with elastic thread, but sometimes, ya just gotta. I had some smaller beads in a matching tone, and did the loops in those, with elastic. Apparently I like this color, because I have a lot of it, in a lot of sizes.

The cuff looked totally elegant on the Niece's wrist. Much better than just this photo could express, actually.   I struggled with the elastic loops, though. If anyone has a hint or two on beading with elastic, especially the knotting and making it stay knotted part, I'd appreciate the help. Honestly, what a hassle!

Next, a gift for the Niece's mother, my sister-in-law. She is a tiny person, and so a bracelet that worked up to fit a tiny wrist. This started with the small netted rope portions, and then I came up with a way to join them, using lustered black/green triangle beads. So the bracelet is flexible enough to bend well, and somehow she wore an outfit on Christmas day that matched the bracelet perfectly. She does love earth tones. 

I sent my sister the hematite netted rope bracelet I'd done a while ago.  I haven't heard from her yet if it arrived in time. I hope so.

No, it's not all bracelets all the time. I sent my dad this ornament. I'd begun it a while ago, but didn't get the inspiration to finish it until last week. I dug out the green dyed shell spear beads, and fringed them around the bottom. This was another use of the dreaded elastic. I made the bottom of the edging from elastic thread so that it will slip on and off any 4 inch glass ornament. If it arrived broken, it wouldn't be a tragedy, or require re-sewing to get it on another ornament. Fortunately, it arrived intact and my dad called to say they loved it, and had hung it in their lanai. Overlooking the alligator pond. In Florida. We can't all have white Christmases.

It was incredibly difficult to get the photo of the ornament. I took 18 pictures, and only this one was anywhere near focused. And it's not perfect. The shiny surface of the bulb got in the way, not to mention you can actually see me taking the picture in the reflection!  And I didn't clear out the work area to take the photo. I was a bit rushed getting it all ready to ship.  My camera is still making me crazy. 

But yes, the last one was a bracelet, for my mom. This too is netted rope. I wanted to try some smaller beads to net, so I used the same size 6 blue/plum beads that were used in the Niece's cuff. 

Netting such small beads (also beads that weren't perfectly spherical) made a little bit of a lumpy piece. These seed beads don't nest together the same way spherical beads do. The lemon-lime netting was fun, though.

Now for the question. In my limited experience, I haven't seen anyone link together sections of netted rope with exactly this technique. Has anyone else? It's an adaptation of the netting stitch, and lends itself to a lot of variations. Would a tutorial be interesting to anyone? I'm not going to bother if everyone says, "oh yeah, I've seen that lots of times."  I liked doing it because it allows the use of the netted rope without having to have zillions of the larger beads and making the same solid rope every time.  I used the same inter-connecting technique on the sister-in-law bracelet above, so you can see that it works up in many different ways.

I guess this is an extension of the discussion on the Etsy Beadweaver's list lately on inspiration, plagiarism, and original design. Is something you think you invented really original? How do you know without extensive research??

Any thoughts on the matter are much appreciated.

Saturday, December 4, 2010

Decisions, Decisions

The December Challenge for the Etsy Beadweaver's Street Team was tough for me, for reasons that shall become clear, I hope. The first image is the finished piece.  I started it a while ago, as an exploration of netted rope, which I talked about in the Elizabethan Sea Slug post.  This is a post about the series of decisions that led to the final look. The reasons behind all the weirdness.

The development from that central piece was....odd. At least to me. At one point, I was very dissatisfied, on the verge of ripping up the center part and salvaging the beads, as it seemed, well, unwieldy and stiff. Those large beads don't flex, not at all.

The ends of the netted rope did just naturally blend into a seamlessly integrated tubular peyote stitch for the neck piece, though. That was nice. But I had no plan. Where the heck were these things going? After a few (boring) rounds of all crystal seed beads, I decided on a two-color spiral. Okay. Look for some orange and some black beads for the spirals. Well, no black. Wait, I have over 200 different seed beads. Can it be true I have no black??

Yep. True. So...very very very dark purple will have to do. These days I'm all about making do, with budget restrictions everywhere.  So I spiraled away, and...hmm. When the side bits were about 3 inches long, I realized the whole thing look like nothing so much (and felt like it, worse, when picked up) as a purse handle. There were curse words. Internally, at least. There was a true feeling of "Argggghhh!!" A purse-handle? Was this truly what I wanted?   I actually spent several days considering whether it was worthwhile to try to figure out a way to find and attach a purse body and submit that to the challenge.

Then I decided that would take too much work and I didn't have enough time or energy to bead an entire purse to go along with the handle, and also, I wouldn't trust the handle to stand up to the kind of use even a dressy purse gets.   I hadn't designed it to take those stresses, and if someone were to purchase such a purse, they'd surely expect good wearability for the price I'd charge.

So it's a necklace. After about 5 inches on each side, I got really tired of tubular peyote. This is something that used to happen to me when I made art quilts, years ago. I'd get tired of whatever stitch I was doing and so each of the four sides would have different stitches on them.  So the tubular peyote had to end. What next? Kumihimo! That works up quickly, and I enjoy doing it while watching TV in the evenings, so it expands my beading time each day. But kumihimo, using the same beads as the peyote, works up more slender than the peyote. On one side I can put the clasp. I have to connect the two disparate braids on the other side...how?

First, sew them together, strongly, of course. Then cover them somehow. I came up with the peyote wrapped into a spiral around and secured to the connected braids.  Where they were sewn together, I decorated it with a double row of beads, on each side of the seam. Not only did it strengthen the seam, it was pretty!

But should those anchor beads have been a different color? I don't know. The shiny size 15 orange beads make a beautiful fabric, but does the whole thing look stupid?   From the back side, it's less graceful. In order not to distort it too much, I left a bit of opening at each end. Is that dopey looking?  I had to move on at this point.

Surprisingly, I think it took me three days to figure out that I needed to make a beaded clasp. Duh. I agonized over how to end the strands and connect a clasp and what findings did I have that I could use? Finally it dawned on me. Just bead one, Lynn.  Not everything should be difficult to decide, should it? But for this piece, it was.  The clasp came out nicely, though. Works well, is the right size in proportion to the necklace, and the loop and the toggle work together.

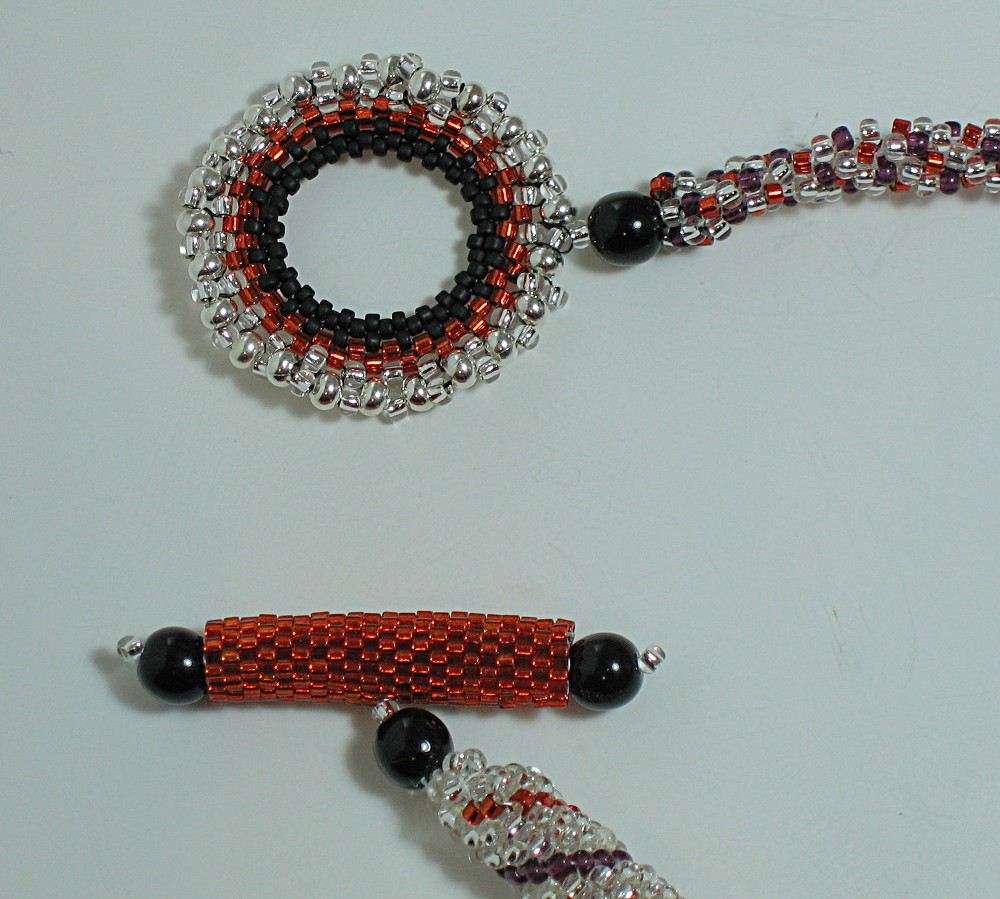
Even before I got the kumihimo finished and the toggle done, though, I thought that it wasn't elaborate enough to be submitted for the challenge. Don't ask me why, I know as well as anyone that often elegant simplicity is far more stunning than complexity for it's own sake. But that's when I started on two fringed elements that I thought would add the necessary finish to the piece. Here are both of them, photographed together. Each is beaded on a base ring of silver 8/0 beads, which can slip over the clasp loop or toggle, together or separately. I thought I would hang them at either side of the central netted rope.

When everything was finished enough to try that, though, it looked pretty stupid, to tell the truth. Because of the stiffness of the central sea slug, those danglies ended up hanging down and pointing right to the wearer's tits. They reminded me of misplaced tassels on the falsies of a very upscale cooch dancer.

I love those lampworked beads, and thought the titty-tassles look didn't serve the work well at all. I considered leaving them off entirely. My husband, patient critic that he is, encouraged me to go with the simpler look.  I delayed submitting the listing so I could contemplate the necklace hanging on the display both with and without the fringed bits, for several days.  I auditioned the fringes at the sides, or hung asymmetrically over the clasp or over the spiral connection on the side opposite the clasp.

I realized the buyer, should she actually ever materialize, could move these bits around and wear them as she likes, or remove them altogether. She could even hang them from earring wires and wear them as earrings!

My final decision was to go with the fringes, configured to hang asymmetrically from the join of the two different braids, on the side opposite the clasp.

What would I do differently if I did the piece over? I might try to have a plan, though sometimes there's a real charm to pieces that just grow.  I would see if I could build in a curve to the central netted rope section to see if it would look more graceful. I'd make the tubular peyote bits much shorter, as I think they're slightly out of proportion. I would find a better way to connect the kumihimo, or just do away with the tubular peyote and make the entire braid out of kumihimo to start with!

Any critique, disagreement, agreement or comments are welcome on this piece. I'm really trying to study hard and develop my design skills, and I can't do that without hearing from others as to what they like or don't find appealing about my designs.

I've actually finished another piece after this that I'm far more pleased with. But it's a gift for a dear friend, and I can't show it until she receives and opens it.  It'll be interesting to see what the challenge brings.

Tuesday, November 23, 2010

Shrinkage

Size matters, when you're talking about things that hold other things.

I've just finished a netted pouch, which I figured would be perfect for holding a cell phone, or a credit card, or some mad money. Only I didn't measure beforehand. Oops.

I did stick my cellphone into it at an intermediate stage, before adding the ultrasuede lining. It fit, though it stuck out the top. That was my first intimation that I had seriously mis-estimated the size of the pouch. Then when I added the lining, the real shrinkage took place. I tried to make the inner pouch fit the outer beading closely, but in order not to have it wrinkle, it had to be smaller. This is not the Tardis, after all.

So I'm officially calling this The Too-Small-For-Nearly-Everything Pouch. A credit card will fit, but sticks up about three-quarters of an inch, which seems foolhardy and prone to disaster. Just about the only thing you can do is put some small change in it, or fold a bill really small. That would work.

Or perhaps you just need to keep this pouch for hopes and dreams. Secrets. Those will fit. I promise. 

Unless you dream really big.  Or keep world-class secrets. Then all bets are off.

You can see the starting point for this piece in the previous post.  The upper border was a happy find, I did a round of what I had intended to be 3-bead picots and ended up being a little netted stitch. Then when I did a second round of three bead netting connectors (it just seemed the right thing to do at the time) I got ruffles!! Who knew?

This will be listed on Etsy when I get a few better pictures. 

I had started a modified Cellini spiral with the red and blue(ish) beads to hang the pouch from, but it was large enough to overwhelm the small pouch. I only did about 4 inches of that before I quit. I'll change that into a bracelet, I think. Then I strung the necklace part on beading wire to make it strong, and it fits the scale of the pouch much better. Much more balanced than the spiral would have been.

The real lesson, though, is to measure first. Add a bit for shrinkage in working. Then add a bit more. Unless you want it to be Too Small For Nearly Everything.

******

In other news, a few more preview shots of the Sea Slug piece. It took me several days to figure out what to do about fastening and embellishing the central netted rope big honking chunk.  And it is big and honking. About 6 inches long. So I did the toggle, and made some removeable fringy elements that I think are going to be really cool.  I think it'll end up a piece that can be worn several ways. Or hung on the wall.  

Thursday, November 11, 2010

The Elizabethan Sea Slug - A Sneak Peek

"Oh my, that's a really odd name for a piece of jewelry, don't you think?"

Yep. But let me explain. In seeking to extend my new netted rope passion a bit into the extreme end of things, I tried a much larger bead as a central anchor. In fact, I started with some sponge coral beads that are about 16 -18mm. These things are huge!

Then I netted with 11/0 crystal beads and some silver-plated 6/0 beads. Well, as anyone who has tried this technique can tell you, it eats the core beads like crazy. Four beads for every round, and since they're solidly packed together, each round is only half a bead tall. 

So I decided after four rounds of the 16mm sponge coral to reduce the size with some 12mm sponge coral beads. Those I used 3 rounds on each side. Then I reduced further with some 8mm onyx beads. Three rounds of those on each end. 

At this point, the piece was lying on my work table while I considered the next step. The shape and size reminded of a beautiful sea slug.

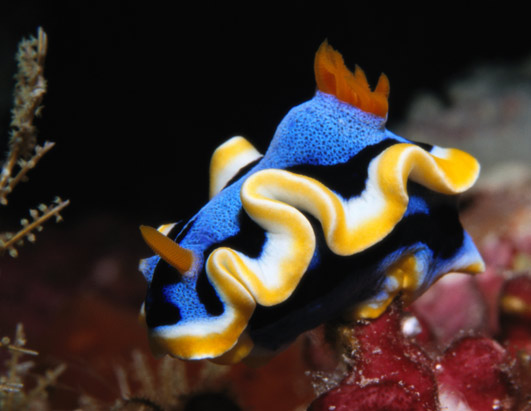
Sea slugs or nudibranchs, are some of the most gorgeous creatures on the face of the earth. I may end up doing a whole series of pieces inspired by the many species. Some of them are so spectacular they look like they were made up by graphic designers who have been enhancing their creativity with recreational chemicals.  I mean, does this one look real to you?

The netted texture made me think of an Elizabethan (or Tudor) jeweled hair snood.  So...an Elizabethan Sea Slug. See, it makes perfect sense. Sort of. 

Now I'm extending the tube with peyote, and starting a spiral of two colors. I have plans for further enhancements as well.  And I had a grand time and gained immense inspiration seeking the images to add to this post. The Sea Slugs images are copyrighted by their owners, I'm just borrowing them.  Sea slug inspired jewelry, coming up.

Extreme Netted Rope. Perhaps a new Olympic event?

Monday, November 8, 2010

Netted Rope Craziness

Kate Tracton has started something here with her instructions (see previous post), for netted rope.  I've got at least two commenters who are going to start using the technique, and yesterday and today, I put together a bracelet. I hope to list it on Etsy soon but apparently I selected The Most Difficult Beads In the Universe to Photograph.

The bracelet is done with 6mm hematite, crystal iridescent 15/0s and transparent red-pop colored 11/0s.  I do not know how in the world to get a good photo of these things. They create, even to the eye, a kind of shimmery surface that moves and glows.  I can't get a good focus, nor a good shot of the real colors of the beads.  These three photos are my best efforts today. 

The bracelet is about 8 inches long, about half an inch wide, and has a magnetic clasp hidden in the join. This clasp is pretty smoothly integrated, it fits really well inside the netted beadwork.

I narrowed each end of the bracelet with 4mm hematite beads for a couple of rows, because I wanted the clasp to integrate and also because I ran short on the 6mm beads, and it wasn't quite long enough. It still isn't long enough for me to wear, as I need larger jewelry.

Photography difficulties aside, the bracelet is lovely in person. I'll be working on more and more in this technique because not only is it easy, the appearance of the finished product can be widely varied.

Saturday, November 6, 2010

Thank You, Kate Tracton

I was looking at some netted ropes and thought I'd try, as you do, to find some instructions on the web. Just try! You can find free tutorials for every kind of spiral out there, all sorts of netting and crocheted things and what have you. Netted rope? Zilch. A few sorta patterns for money, but nothing precisely like I wanted.

Then, on the Etsy Beadweavers email list, this, from Kate Tracton:

"String four pearls alternated with four size 11 seed beads. Tie into a circle. Step up through a seed bead and do a net around each pearl using size 15's and an 11 in the center. Go around all the pearls and step up to the center 11 in the next net. Add a pearl, and come out the next center 11. As you progress, you pull the loops up around the pearls.  Continue those two rows for as long as you need.

"Lather, rinse, repeat" :D"

So, I sat down with thread, needle, some pearl substitutes, and the aforementioned 15 and 11 seed beads. The colors were awful, but this is a test sample, not a finished piece.  And behold, it was easy!  For something that looks so complex, amazingly easy.

So thanks, Kate, for so generously sharing a technique. I can see that to make it more flexible, I need more beads in the netting. The way it is, it's great for making netted beads, as pulling the thread tight makes it very stiff. Varying the sizes of the "pearls" would make an oval bead.  Quite a bit can be done with it, I think, and I'm looking forward to exploring. So thank you, Kate.

Your generosity is much appreciated.

Sunday, October 17, 2010

Why the Occasional Cold is Not Such A Bad Idea

Really. Because when you have a cold, and then get over it, the experience makes you appreciate the state of "not having a cold" so much more.

It was an odd little virus. Coughing, sneezing, feeling blah, three days and out. Then a couple of days of kind of wondering what the hell? as I've never gotten over a cold so fast, and my head still felt a little...coldish. Like I could feel the outlines of my sinuses in my head, even though they didn't hurt, as such. Today all that sinus-blech decided to clear out. Oh joy. Oh well, as I said, when it's completely gone, I will, for a while, appreciate the hell out of feeling well.

I got the camera back, and since then, have been trying and trying to get a properly focused picture, without success. Well, one tiny success.  There you see it, the sole well-focused picture out of about 60. Don't ask me what settings I used. Couldn't tell you.

I'm going to retire to the couch with the darn owner's manual and figure this thing out before it kills me. I know this camera can take marvelous pictures!   I'm determined I'll be the one behind the shutter when it does!

The picture is of the fringe of the piece I'm working on, an amulet or charm bag woven in netting stitch, from a book called Netted Beadwork by Diane Fitzgerald.  Of course, when my dear husband saw the bag section, he looked at the size and shape and asked me, "Why are you making a penis-cozy?" 

After I finished laughing, I started to wonder if there might be a market in adorning private parts with beads.  Hmm.  If anyone wants to commission a cozy, I'll need measurements. And some elastic thread, because men always exaggerate.

More pictures of the piece, which I'm really pleased with, as the camera cooperates.