Tuesday, November 23, 2010

Shrinkage

Size matters, when you're talking about things that hold other things.

I've just finished a netted pouch, which I figured would be perfect for holding a cell phone, or a credit card, or some mad money. Only I didn't measure beforehand. Oops.

I did stick my cellphone into it at an intermediate stage, before adding the ultrasuede lining. It fit, though it stuck out the top. That was my first intimation that I had seriously mis-estimated the size of the pouch. Then when I added the lining, the real shrinkage took place. I tried to make the inner pouch fit the outer beading closely, but in order not to have it wrinkle, it had to be smaller. This is not the Tardis, after all.

So I'm officially calling this The Too-Small-For-Nearly-Everything Pouch. A credit card will fit, but sticks up about three-quarters of an inch, which seems foolhardy and prone to disaster. Just about the only thing you can do is put some small change in it, or fold a bill really small. That would work.

Or perhaps you just need to keep this pouch for hopes and dreams. Secrets. Those will fit. I promise. 

Unless you dream really big.  Or keep world-class secrets. Then all bets are off.

You can see the starting point for this piece in the previous post.  The upper border was a happy find, I did a round of what I had intended to be 3-bead picots and ended up being a little netted stitch. Then when I did a second round of three bead netting connectors (it just seemed the right thing to do at the time) I got ruffles!! Who knew?

This will be listed on Etsy when I get a few better pictures. 

I had started a modified Cellini spiral with the red and blue(ish) beads to hang the pouch from, but it was large enough to overwhelm the small pouch. I only did about 4 inches of that before I quit. I'll change that into a bracelet, I think. Then I strung the necklace part on beading wire to make it strong, and it fits the scale of the pouch much better. Much more balanced than the spiral would have been.

The real lesson, though, is to measure first. Add a bit for shrinkage in working. Then add a bit more. Unless you want it to be Too Small For Nearly Everything.

******

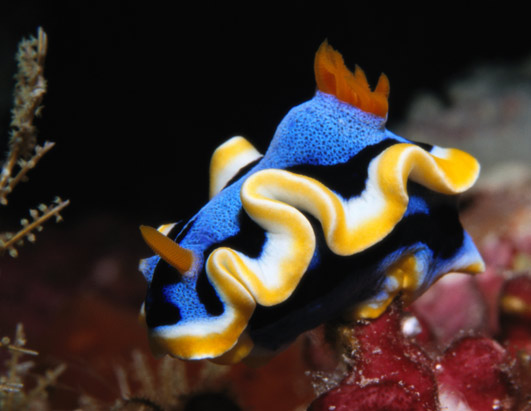
In other news, a few more preview shots of the Sea Slug piece. It took me several days to figure out what to do about fastening and embellishing the central netted rope big honking chunk.  And it is big and honking. About 6 inches long. So I did the toggle, and made some removeable fringy elements that I think are going to be really cool.  I think it'll end up a piece that can be worn several ways. Or hung on the wall.  

Friday, November 19, 2010

The Transformational Nature of Beading

On a whim, I started a new piece, with the much-enjoyed netting stitch. I think it's going to be a cell-phone pouch. Or perhaps something less practical...a place to keep secrets, maybe.  

In the process, I learned something new. For some reason, although I've seen it before, I never understood, until this piece, the difference between beads-in-a-tube, and beads arranged as I've conceived them to be.

I'm not expressing this well. Perhaps the pictures will help.

The beads I'm talking about are short bugle beads, of a translucent rosy ruby color. They are unique among my current collection in that they're straight hexagonal beads, rather than round or twisted.  The first photo shows them in the flip-top tube I use to store them.  I hope that the other photos communicate the texture of the beadweaving. I know they can't transmit the sensuous feel of the netting as it moves in one's hand. That's where the real-world experience of a piece is invaluable. 

In the store, I thought the color of the beads was unique. I got these at Beadiak, in Agoura Hills. It's one of my favorite stores. Their selection of stuff just seems to coincide with what I want at the moment. The bugles in question came in a hank, for a very reasonable price. Then I brought them home, logged them in my software, and stored them in a tube.  I thought the color was lovely.

But it wasn't until I'd woven the netting bag that I saw their true nature. The hexagons reflected the light in coordinated yet individual directions. The flexibility of the netting enhances this property as it bends and moves with manipulation.  

I had taken something pretty, and made it into something beautiful. I created beauty. A raw material transformed into more than the sum of it's parts. It's not just bugle beads and thread. It's art. 

And in transforming these materials, I transformed myself. 

Not bad for a slightly gloomy Friday afternoon the week before Thanksgiving, huh?


Sunday, November 14, 2010

You Need a Good Beading

That's what my husband said to me yesterday. He was right.

I was grumpy and out of sorts with the whole world, and what I needed was to sit down and Do Art.  So I worked on my new extreme netted rope necklace and moved it along a bit.  I don't know if it'll be successful, but it will certainly be spectacular!

In the neighborhood of spectacular (great transition, huh? I should do transitions for pay), we've also been discussing the fact that it doesn't seem right to make a blog post without a picture. Now, it doesn't seem like I can always come up with a picture of current or past work, as taking the pics, uploading to computer, cropping, correcting, etc.  all takes work. So I thought I'd put up another inspiring sea slug image.  Wouldn't this one make a terrific brooch?

One of the reasons sea slugs are so brilliantly colorful is to warn predators that they are dangerously toxic. "Eat Me and Die" is the basic message. Why they are also totally gorgeous isn't explained by that fact, though. A simple solid color would do as well, but the variety of forms and the stunning color combinations are completely over the top. One could do worse than study sea slugs to learn how to combine colors and forms.

This is the 100th post on my blog. 100!!  The blog began on March 9, 2010, though it seems like a lot longer than 8 months. If it were a TV show, it could now be sold for syndication.  Of course, if it was a TV show, I'd be a rich Hollywood producer and too good to blog for the peasants...

I think I need another good beading. Carry on with what you were doing. 

Thursday, November 11, 2010

The Elizabethan Sea Slug - A Sneak Peek

"Oh my, that's a really odd name for a piece of jewelry, don't you think?"

Yep. But let me explain. In seeking to extend my new netted rope passion a bit into the extreme end of things, I tried a much larger bead as a central anchor. In fact, I started with some sponge coral beads that are about 16 -18mm. These things are huge!

Then I netted with 11/0 crystal beads and some silver-plated 6/0 beads. Well, as anyone who has tried this technique can tell you, it eats the core beads like crazy. Four beads for every round, and since they're solidly packed together, each round is only half a bead tall. 

So I decided after four rounds of the 16mm sponge coral to reduce the size with some 12mm sponge coral beads. Those I used 3 rounds on each side. Then I reduced further with some 8mm onyx beads. Three rounds of those on each end. 

At this point, the piece was lying on my work table while I considered the next step. The shape and size reminded of a beautiful sea slug.

Sea slugs or nudibranchs, are some of the most gorgeous creatures on the face of the earth. I may end up doing a whole series of pieces inspired by the many species. Some of them are so spectacular they look like they were made up by graphic designers who have been enhancing their creativity with recreational chemicals.  I mean, does this one look real to you?

The netted texture made me think of an Elizabethan (or Tudor) jeweled hair snood.  So...an Elizabethan Sea Slug. See, it makes perfect sense. Sort of. 

Now I'm extending the tube with peyote, and starting a spiral of two colors. I have plans for further enhancements as well.  And I had a grand time and gained immense inspiration seeking the images to add to this post. The Sea Slugs images are copyrighted by their owners, I'm just borrowing them.  Sea slug inspired jewelry, coming up.

Extreme Netted Rope. Perhaps a new Olympic event?

Monday, November 8, 2010

Netted Rope Craziness

Kate Tracton has started something here with her instructions (see previous post), for netted rope.  I've got at least two commenters who are going to start using the technique, and yesterday and today, I put together a bracelet. I hope to list it on Etsy soon but apparently I selected The Most Difficult Beads In the Universe to Photograph.

The bracelet is done with 6mm hematite, crystal iridescent 15/0s and transparent red-pop colored 11/0s.  I do not know how in the world to get a good photo of these things. They create, even to the eye, a kind of shimmery surface that moves and glows.  I can't get a good focus, nor a good shot of the real colors of the beads.  These three photos are my best efforts today. 

The bracelet is about 8 inches long, about half an inch wide, and has a magnetic clasp hidden in the join. This clasp is pretty smoothly integrated, it fits really well inside the netted beadwork.

I narrowed each end of the bracelet with 4mm hematite beads for a couple of rows, because I wanted the clasp to integrate and also because I ran short on the 6mm beads, and it wasn't quite long enough. It still isn't long enough for me to wear, as I need larger jewelry.

Photography difficulties aside, the bracelet is lovely in person. I'll be working on more and more in this technique because not only is it easy, the appearance of the finished product can be widely varied.

Saturday, November 6, 2010

Thank You, Kate Tracton

I was looking at some netted ropes and thought I'd try, as you do, to find some instructions on the web. Just try! You can find free tutorials for every kind of spiral out there, all sorts of netting and crocheted things and what have you. Netted rope? Zilch. A few sorta patterns for money, but nothing precisely like I wanted.

Then, on the Etsy Beadweavers email list, this, from Kate Tracton:

"String four pearls alternated with four size 11 seed beads. Tie into a circle. Step up through a seed bead and do a net around each pearl using size 15's and an 11 in the center. Go around all the pearls and step up to the center 11 in the next net. Add a pearl, and come out the next center 11. As you progress, you pull the loops up around the pearls.  Continue those two rows for as long as you need.

"Lather, rinse, repeat" :D"

So, I sat down with thread, needle, some pearl substitutes, and the aforementioned 15 and 11 seed beads. The colors were awful, but this is a test sample, not a finished piece.  And behold, it was easy!  For something that looks so complex, amazingly easy.

So thanks, Kate, for so generously sharing a technique. I can see that to make it more flexible, I need more beads in the netting. The way it is, it's great for making netted beads, as pulling the thread tight makes it very stiff. Varying the sizes of the "pearls" would make an oval bead.  Quite a bit can be done with it, I think, and I'm looking forward to exploring. So thank you, Kate.

Your generosity is much appreciated.

Almost, But Not Quite

In my last epic, I described my struggles with my beaded bezel. Well, I've had some success, and more struggling. The bezel itself looks great. It took about four tries to figure out what to do in the center of the donut, and about six to get the embellishments around the outside to satisfy me. 

Now I'm between the first and second attempt to fasten it to the spiral (a Cellini spiral with drop beads for the large spine). The problem is that there is no single place that's the "center" of the strand, and what there is is angled with the spiral. The first time through, I picked the wrong spiral. Oops. Offcenter is not what I want.  But the way the pendant and the necklace strand look together is pleasing me greatly.

I may end up doing some kind of netting between the pendant and the spiral, I'm not sure those bugle beads are going to make it. The good thing about beads is you can always recycle the beads themselves if you don't mind trashing the thread. Thread, it turns out, is the least of it. 

The red and green are so rich, jeweltones that sing. The silver is just present enough to complement, not overwhelm the colors. It will be beautiful when it's done. I'm glad I didn't try to rush something to make the deadline for the challenge.

Perhaps someone will be longing for a Christmas necklace when I get it done and listed.

Thursday, November 4, 2010

Starting Over, and the 1mm Difference

On a beading project, or segment of a project, that is. I really hate ripping out, salvaging beads and starting over.  But sometimes there just isn't any choice.  Something just tells you it's Not Right.

I've been trying to get a holiday necklace done, for an entry in the Etsty Beadweaver's Team challenge for November. I'm not going to make the deadline tomorrow, unfortunately. But the piece will be better for the delay, I think.

I was attempting my first beaded bezel without a back, using a malachite donut (similar to the one pictured here) about the size of a Susan B. Anthony dollar (remember those?) and size 15 and 11 seed beads to do a peyote bezel.  The first attempt I made was with silver 15 delicas and 11 nickel-silver color beads. It fit okay, though I thought it covered too much of the face of the donut and hid the beautiful malachite patterns. I'd started with a circle of beads that was just a few beads too small. But...it was lumpy. And there were unfortunate holes in it here and there. Not huge holes, just places where I'd skipped a bead, intentionally or not.

I was contemplating whether to cover the bezel with more embellishment to cover those imperfections when I realized the whole deal didn't work for me. The malachite was subtle and gorgeous, and the silver beads were too harsh against the green. 

So I cut the bezel off the donut, and spent about 15 minutes unstringing, chasing and re-sorting beads into their containers. Then I hunted up a bunch of 15/0 beads in greens that mimicked the malachite and started again. 3 rounds of 15s later, I added two rounds of 11s to fit the rim and then started trying to reduce the other side using 15s again, only to find that I had a way-oversized bezel that rippled and ruffled, rather than snugging down around the donut. 

After some choice words, I pulled out 4 whole rounds, back to the first round of 11s. Just that one single round extra made the whole bezel unworkable. By removing the extra round of 11s, the whole thing worked. That's a size difference of about 1mm, by the time all is said and done. Remarkable that it was such a dramatic impediment, that tiny difference.

The green colors of the new bezel complement and extend the visual size of the malachite donut wonderfully. It's going to resemble a holiday wreath when I get finished with the embellishments I intend to add. 

It won't make the challenge. It will make me happy, though, when I finish with it.  I have to learn to listen to my "not right" detectors a little bit faster, I think.