Sunday, December 26, 2010

Adios to Christmas Gifts

Now I can put up photos of gifts that went out this year. I've been waiting, because I have a question about the last one.  Reading a post about the gift you're being given is the modern digital equivalent of finding your packages hidden in your mother's closet and very carefulllllly peeling off the tape to see if you can get a peek. Not that I ever did that. Mom. Really. Never.

I was amazed that these first two fit their recipients so well. My husband and son were chivvying me that they were way too small. Ha! They fit perfectly. So there. 

I made a simple peyote stitch cuff for my niece. The size 6 blue/plum beads worked up quickly, and then it cried out for some gold edging. I happened to have some huge 16mm glass beads in almost exactly the same iridescent color, so they became the double buttons. I have found I intensely dislike working with elastic thread, but sometimes, ya just gotta. I had some smaller beads in a matching tone, and did the loops in those, with elastic. Apparently I like this color, because I have a lot of it, in a lot of sizes.

The cuff looked totally elegant on the Niece's wrist. Much better than just this photo could express, actually.   I struggled with the elastic loops, though. If anyone has a hint or two on beading with elastic, especially the knotting and making it stay knotted part, I'd appreciate the help. Honestly, what a hassle!

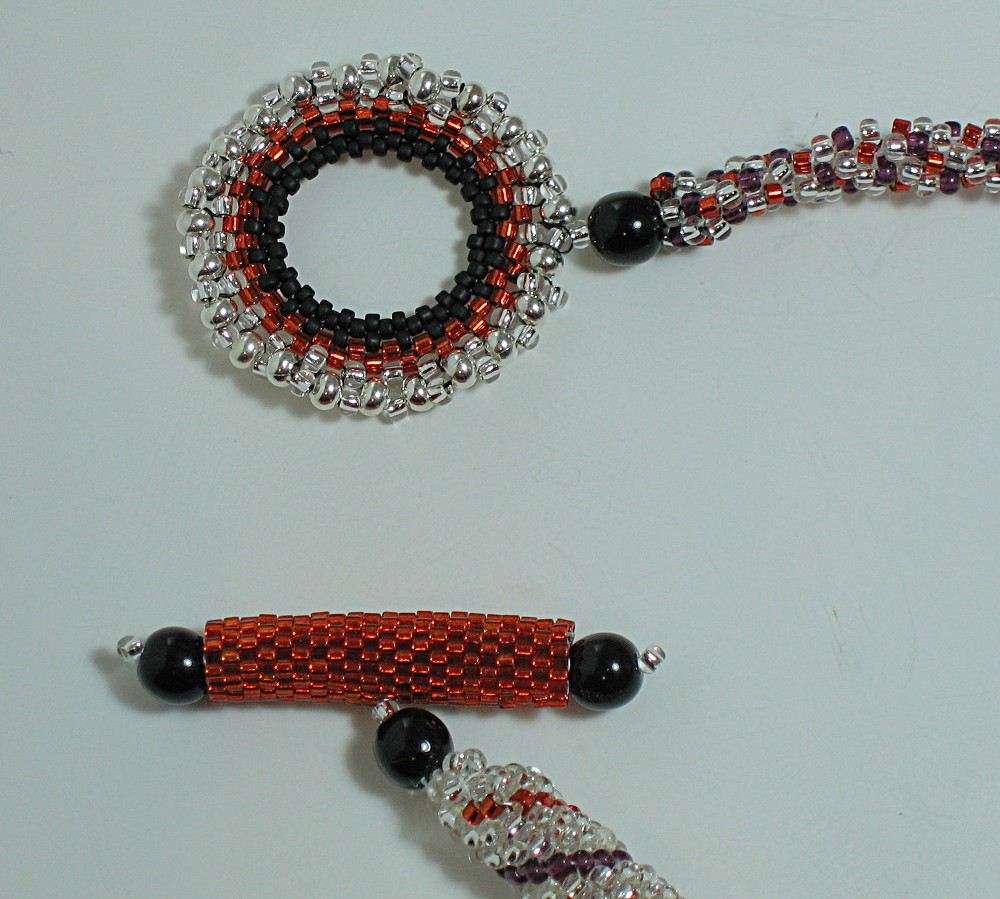
Next, a gift for the Niece's mother, my sister-in-law. She is a tiny person, and so a bracelet that worked up to fit a tiny wrist. This started with the small netted rope portions, and then I came up with a way to join them, using lustered black/green triangle beads. So the bracelet is flexible enough to bend well, and somehow she wore an outfit on Christmas day that matched the bracelet perfectly. She does love earth tones. 

I sent my sister the hematite netted rope bracelet I'd done a while ago.  I haven't heard from her yet if it arrived in time. I hope so.

No, it's not all bracelets all the time. I sent my dad this ornament. I'd begun it a while ago, but didn't get the inspiration to finish it until last week. I dug out the green dyed shell spear beads, and fringed them around the bottom. This was another use of the dreaded elastic. I made the bottom of the edging from elastic thread so that it will slip on and off any 4 inch glass ornament. If it arrived broken, it wouldn't be a tragedy, or require re-sewing to get it on another ornament. Fortunately, it arrived intact and my dad called to say they loved it, and had hung it in their lanai. Overlooking the alligator pond. In Florida. We can't all have white Christmases.

It was incredibly difficult to get the photo of the ornament. I took 18 pictures, and only this one was anywhere near focused. And it's not perfect. The shiny surface of the bulb got in the way, not to mention you can actually see me taking the picture in the reflection!  And I didn't clear out the work area to take the photo. I was a bit rushed getting it all ready to ship.  My camera is still making me crazy. 

But yes, the last one was a bracelet, for my mom. This too is netted rope. I wanted to try some smaller beads to net, so I used the same size 6 blue/plum beads that were used in the Niece's cuff. 

Netting such small beads (also beads that weren't perfectly spherical) made a little bit of a lumpy piece. These seed beads don't nest together the same way spherical beads do. The lemon-lime netting was fun, though.

Now for the question. In my limited experience, I haven't seen anyone link together sections of netted rope with exactly this technique. Has anyone else? It's an adaptation of the netting stitch, and lends itself to a lot of variations. Would a tutorial be interesting to anyone? I'm not going to bother if everyone says, "oh yeah, I've seen that lots of times."  I liked doing it because it allows the use of the netted rope without having to have zillions of the larger beads and making the same solid rope every time.  I used the same inter-connecting technique on the sister-in-law bracelet above, so you can see that it works up in many different ways.

I guess this is an extension of the discussion on the Etsy Beadweaver's list lately on inspiration, plagiarism, and original design. Is something you think you invented really original? How do you know without extensive research??

Any thoughts on the matter are much appreciated.

Wednesday, December 22, 2010

Quiet Times On the Blog

It's been quiet because I imagine that like me, most people are scrambling to get ready for the holidays. I've got a lot of presents in the mail, so no pictures to show until the day. 

But I do have a couple of items I've been working on to show.
Old Gold button

A couple of weeks ago I put up some pictures and solicited some critique. I decided that the advice to change out the button on a previously completed bracelet was wise. So this bracelet went from gold to silver. The new button is slightly smaller and thus fits the loop better, and it blends more smoothly with the cherry-pop red and opalescent green/purple/blue of the small beads.

New Gold button
The silver is more understated. Good call, advisors. 

In other news, I've been netting my little heart out. This bit here is a trial to see what a 4.5-5mm bead looks like. I had a fair quantity of multi-colored various stones, and netted them with an opalescent crystal size 15 bead. Lovely. 

I'm not sure what this will end up as. Not a bracelet as it's too stiff to bend easily. Part of a necklace almost certainly. But like most of these netting bits, it's not long enough by itself, and when I was buying beads I didn't anticipate having to buy four times the length needed. I just simply don't have enough of any single bead to do an entire necklace in netted rope.  One thing I plan to do next time I get money to spend is buy enough 3-4mm beads to make a whole necklace.

Here's a sneak preview of something that I hope will be my Feb challenge entry. It's done in green jasper with gold netting and gold beads with green netting, with the larger rose-lined forest green intersection beads remaining constant. I've got some additional bits done but no pictures yet.  By combining beads I've got enough length for the central part of the necklace.  There will also be a big bead-embroidery component too. I think. I'll have to see as I get there. I really like the coordinating themes in the part in the picture. Something about forest green and gold is so...elegant.


And here, too late to list on Etsy for Christmas is another Cellini spiral necklace I finished. This was the one I started to explore a backless bezel for the malachite donut.  That part turned out well, I think. However, in the process of working that bezel, what happened was that in some sections, especially the top part, I passed so many threads through those tiny size 15 beads that the tension got very very tight, and a few of the beads just broke after one last yank! of thread through them.  Oops.  Live and learn.

So then I had to figure out what to do to connect the pendant to the spiral. If you just sling a single strand of beads over, even if you follow the spiral, the pendant hangs crooked. But  if you look at the close-up picture, you'll see that by doing one diagonal from left front, over the spiral, to the left rear, and then compensating with a shorter link of beads to the right front, it works. There's a matching short link in the back. It straightens out the pendant wonderfully, while not actually sewing the pendant to the spiral. Trying to sew to a spiral and get everything centered and balanced is a losing proposition.
In fact, the pendant can actually "screwed" down the spiral and off the necklace entirely, if you want.  It will come off over the flexible beaded catch. The spiral is done with 3-4mm drop beads which give a lovely look to it, with transparent red, christmas green, and nickel-plated silver beads.   I need better pictures to list this one. Still struggling with the camera. I'm beginning to think that it's not me, it's the camera. I just can't get really sharp pictures without a lot of fuss. 

Friday, December 10, 2010

A Gift for a Friend

Existing Amber Necklace
I have a friend who is a beader, and a jeweler, as well.  Years ago, she spent time making wonderful clasps and pendants out of silver, bronze, and brass, cast from real natural leaves, acorns, and other tree bits.

During our last visit, she greatly admired my amber necklace, and I tried to give it to her, but she's slippery. Instead, she gave me a whole bunch of her cast clasps and pendants.  I seem to remember her telling me this was so I could use them and she could see how they worked in actual necklaces, so I got the impression she'd not used her own clasps extensively. 

For My Friend
These findings are substantial chunks of high-purity silver, and would probably cost upward of $200 in a store.  The clasp itself is about 2 inches stem to tip, and slightly longer from side to side. The twig is about an inch and a quarter long. Solid silver. I could never afford to buy anything like this for my work, not unless I had a commission.

 I knew all along that she was having some serious health issues, and after our last visit, I found out that these are worse than anyone knew. So I felt some urgency to make sure she knew how wonderful her work really is. 

Her Silver Leaf Clasp
This is the resulting piece. I chose what I thought was one of the sweetest of the leaf clasps she gave me. The use of a real twig cast in silver as the toggle is genius. I tried to capture the detail properly in my pictures, up close you can see every vein in the leaf, every striation of the twig, they look absolutely true to life.  

New Necklace
The braid is kumihimo in amber, yellow, and nickel-silver seed beads, the cones are sterling, and the fringes are made with genuine amber, citrine, and carnelian.   At first, I wondered if using both silver and gold (and amber) in one piece would work, but thought that by scattering some silver throughout the whole piece, it would work out, and it did. Wonderfully. The leaf is stunning, though I suspect people are going to want to fondle it. I guess that's her problem. 
Clasp, separated

After an absolute orgy of photography, and then computer work, I felt I had good documentation of the necklace, and sent it off a few days ago.

Fringe & Clasp
I'm happy to say she got it today and is very pleased.  I hope the healing thoughts I put into the placement of every bead comfort her and do some good. 

Tuesday, December 7, 2010

A Question For The Ages

Why are clams our benchmark for happiness? I mean, really?

"Happy as a clam."  How could you tell?

"Happy as a pig in sh**." Now that I can see. Clams, though. I'm at a loss, here.

Sunday, December 5, 2010

On the Necessity of Critique, and Oh Darn, It's Present Time

I'm finishing new pieces all over the place, and can't post them because they're presents and family members might see them here!

Expect a flood of "you haven't seen this, it was given to X" posts after the holiday, though. That will be fun. There is one piece I can put up. It'll be listed on Etsy shortly.

After I did my Too Small For Nearly Everything pouch, I started a modified Cellini spiral to hang it from, but the spiral just overpowered the delicacy of the netting on the pouch. It was like hanging a canary cage from a pit-bull chain. (I've been working on my metaphors. Or maybe that's a simile. I get those confused.)  Good image, though, huh?

So I just made the spiral into a quick bracelet, using a gold-over-ceramic bead as a button closure.  Question: is there some kind of formula to figure out how many beads on the loop closure? I always struggle with that. Many times I think I've measured properly, only to have the loop end up too tight once finished. One can always tighten a loop, but loosening involves unpicking and redoing the beading. Ugh.

I also wanted to talk a little about critique. To me, this means "tell me what you would have done differently, or how you see the balance of the elements, or what sticks out like a sore thumb, or whatever."  Critique is necessary to growth as an artist (perhaps in other areas as well but we're talking art here), as necessary as practice, and access to materials and time.

I have to say that all the comments I've gotten about my December Challenge piece have been wonderful and supportive and much appreciated. I particularly like when people share their own struggles with design and execution. Not only does it reassure me I'm not alone, it helps me see how others overcome the problems they encounter, and gives me hints as to how to solve those or similar problems when I encounter them.

I really really really don't want this to sound like complaint, nor do I mean it to discourage comments (because golly, all those supportive comments feel great!), but good critique seems to be near impossible to find.  I once joined a local art-quilter's group, seeking critiques of my work. Even when they had agreed to do so, people just couldn't seem to bring themselves to say anything negative about someone else's work, even when that comment might help that person improve their art. Or when that person has agreed in advance to take critique in the spirit offered. 

I know there's a lot of confusion of critique with criticism, which has many negative connotations and can indeed be done in a spirit of meanness. Some people are very sensitive to any hint of conflict or negativity...particularly women of a certain age, who've been trained in our society's Cult of Niceness.  In critique, one can pick apart the details of a work, while still thinking that work is wonderful, overall. Not Perfect doesn't in any way mean Not Good.

I work with my husband as an editor of his writing. Over the course of years, we've evolved a teamwork and critique method that results in writing far above what either of us could do alone. I started by never telling him his writing was good when it wasn't. Boy, talk about your inconvenient truths!!! That took some supremely diplomatic phrasing, as well as encouragement and admiration, even if it was only for effort.  That way, when I did praise his work, he could trust that I was evaluating honestly.  No BS, basically. Now, after much practice, his writing is of consistently high quality. I find myself editing more for typos and missed words than for issues of style or content.  It wasn't an easy process, and required both of us to act like adults (way too tough, some days), but it has resulted in something of lasting value.

I would sincerely like to have that kind of critique and development teamwork with other bead artists. I need to get better at the craft and art of what I do, and I feel like simply stumbling around working alone isn't going to get me there. Perhaps I feel pressed for time. Seems like I need to move this along, having come to beading so late in life.

My question is, do any of you seek or participate in critique groups? If you do, does it help you the way I think it might help me? Where would I look to find such critique groups? 

Saturday, December 4, 2010

Decisions, Decisions

The December Challenge for the Etsy Beadweaver's Street Team was tough for me, for reasons that shall become clear, I hope. The first image is the finished piece.  I started it a while ago, as an exploration of netted rope, which I talked about in the Elizabethan Sea Slug post.  This is a post about the series of decisions that led to the final look. The reasons behind all the weirdness.

The development from that central piece was....odd. At least to me. At one point, I was very dissatisfied, on the verge of ripping up the center part and salvaging the beads, as it seemed, well, unwieldy and stiff. Those large beads don't flex, not at all.

The ends of the netted rope did just naturally blend into a seamlessly integrated tubular peyote stitch for the neck piece, though. That was nice. But I had no plan. Where the heck were these things going? After a few (boring) rounds of all crystal seed beads, I decided on a two-color spiral. Okay. Look for some orange and some black beads for the spirals. Well, no black. Wait, I have over 200 different seed beads. Can it be true I have no black??

Yep. True. So...very very very dark purple will have to do. These days I'm all about making do, with budget restrictions everywhere.  So I spiraled away, and...hmm. When the side bits were about 3 inches long, I realized the whole thing look like nothing so much (and felt like it, worse, when picked up) as a purse handle. There were curse words. Internally, at least. There was a true feeling of "Argggghhh!!" A purse-handle? Was this truly what I wanted?   I actually spent several days considering whether it was worthwhile to try to figure out a way to find and attach a purse body and submit that to the challenge.

Then I decided that would take too much work and I didn't have enough time or energy to bead an entire purse to go along with the handle, and also, I wouldn't trust the handle to stand up to the kind of use even a dressy purse gets.   I hadn't designed it to take those stresses, and if someone were to purchase such a purse, they'd surely expect good wearability for the price I'd charge.

So it's a necklace. After about 5 inches on each side, I got really tired of tubular peyote. This is something that used to happen to me when I made art quilts, years ago. I'd get tired of whatever stitch I was doing and so each of the four sides would have different stitches on them.  So the tubular peyote had to end. What next? Kumihimo! That works up quickly, and I enjoy doing it while watching TV in the evenings, so it expands my beading time each day. But kumihimo, using the same beads as the peyote, works up more slender than the peyote. On one side I can put the clasp. I have to connect the two disparate braids on the other side...how?

First, sew them together, strongly, of course. Then cover them somehow. I came up with the peyote wrapped into a spiral around and secured to the connected braids.  Where they were sewn together, I decorated it with a double row of beads, on each side of the seam. Not only did it strengthen the seam, it was pretty!

But should those anchor beads have been a different color? I don't know. The shiny size 15 orange beads make a beautiful fabric, but does the whole thing look stupid?   From the back side, it's less graceful. In order not to distort it too much, I left a bit of opening at each end. Is that dopey looking?  I had to move on at this point.

Surprisingly, I think it took me three days to figure out that I needed to make a beaded clasp. Duh. I agonized over how to end the strands and connect a clasp and what findings did I have that I could use? Finally it dawned on me. Just bead one, Lynn.  Not everything should be difficult to decide, should it? But for this piece, it was.  The clasp came out nicely, though. Works well, is the right size in proportion to the necklace, and the loop and the toggle work together.

Even before I got the kumihimo finished and the toggle done, though, I thought that it wasn't elaborate enough to be submitted for the challenge. Don't ask me why, I know as well as anyone that often elegant simplicity is far more stunning than complexity for it's own sake. But that's when I started on two fringed elements that I thought would add the necessary finish to the piece. Here are both of them, photographed together. Each is beaded on a base ring of silver 8/0 beads, which can slip over the clasp loop or toggle, together or separately. I thought I would hang them at either side of the central netted rope.

When everything was finished enough to try that, though, it looked pretty stupid, to tell the truth. Because of the stiffness of the central sea slug, those danglies ended up hanging down and pointing right to the wearer's tits. They reminded me of misplaced tassels on the falsies of a very upscale cooch dancer.

I love those lampworked beads, and thought the titty-tassles look didn't serve the work well at all. I considered leaving them off entirely. My husband, patient critic that he is, encouraged me to go with the simpler look.  I delayed submitting the listing so I could contemplate the necklace hanging on the display both with and without the fringed bits, for several days.  I auditioned the fringes at the sides, or hung asymmetrically over the clasp or over the spiral connection on the side opposite the clasp.

I realized the buyer, should she actually ever materialize, could move these bits around and wear them as she likes, or remove them altogether. She could even hang them from earring wires and wear them as earrings!

My final decision was to go with the fringes, configured to hang asymmetrically from the join of the two different braids, on the side opposite the clasp.

What would I do differently if I did the piece over? I might try to have a plan, though sometimes there's a real charm to pieces that just grow.  I would see if I could build in a curve to the central netted rope section to see if it would look more graceful. I'd make the tubular peyote bits much shorter, as I think they're slightly out of proportion. I would find a better way to connect the kumihimo, or just do away with the tubular peyote and make the entire braid out of kumihimo to start with!

Any critique, disagreement, agreement or comments are welcome on this piece. I'm really trying to study hard and develop my design skills, and I can't do that without hearing from others as to what they like or don't find appealing about my designs.

I've actually finished another piece after this that I'm far more pleased with. But it's a gift for a dear friend, and I can't show it until she receives and opens it.  It'll be interesting to see what the challenge brings.