Showing posts with label peyote. Show all posts

Friday, September 16, 2011

Beading Returns to Life, and How to Get Great Art Stuff for Almost Nothing

Things have slowed down a bit with the software, so I have been able to feel a bit of creativity creeping back into my life.

I've also found a way to acquire more artistic fuel (beads & materials) without spending money...trade!  I think this is a terrific way for fellow artists to support one another and to spread the creativity around.
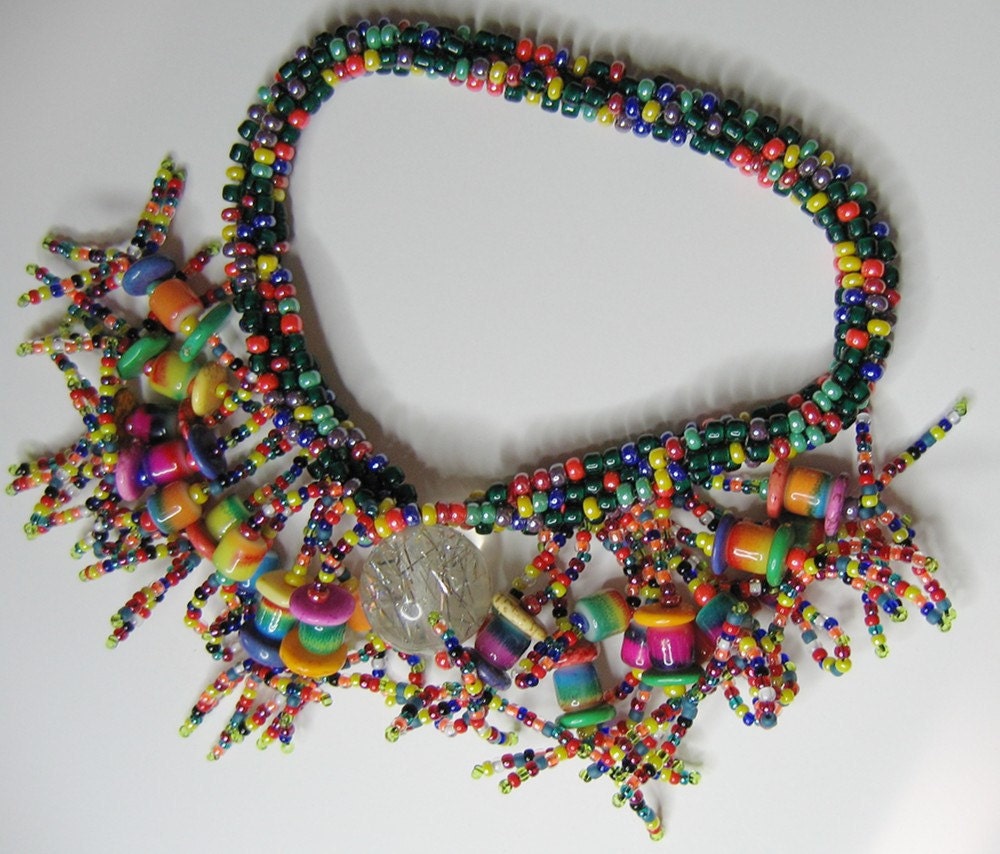
Original bracelet
Several weeks ago, at a local farmer's market, Ruth Wood saw me wearing my new tutti-frooti bracelet. (Tootie-frutti? There are a dozen ways to spell this, all of which my spell-checker rejects.)  Ruth does wonderful fused glass cabochon work, and after I let her try on the bracelet I happened to be wearing, we worked out a deal to trade a similar bracelet made to fit her for some of her cabs.
Ruth's bracelet

This is her bracelet, to be delivered this Sunday at the market.  I'll post some pictures of the cabs next week.  I also made some earrings to go with, so we'll see what happens with them!

We each worked out what we would sell our pieces for, retail. We agreed that trading retail values was fair, as this included the labor (and profit) as well as materials. Tiny bits of glass for fused cabs cost nearly nothing, its the work and expertise that make them valuable. The same, or nearly the same goes for the beads. Material costs are small, but those hours creating fringe add up!

Earrings to go with
Of course, the IRS wants you to declare the value of traded goods and pay taxes on them, unless you have a resale license. Both Ruth & I do, so consult with your tax expert on your own situation. Don't Mess the IRS is our policy around here. Those people are scarier than Homeland Security!

In other beady news, I built a peyote bracelet with some 4mm cube beads in a very elusive color. I don't know exactly what to call it. The description on the tube was "jade" but it's got a lot of bronze, yellow, and opalescent notes in it. These pictures actually represent it pretty well. What would you call it?
"Jade?"

The edge beads are hematite rounds, 4mm, which fit exactly with the cubes.  They give the whole bracelet a solid heft that the light cubes do not. I like it, actually. I think when I list it on Etsy, I'll do some research and tout the spiritual values of hematite. 

What color is it, really?
The newest issue of Bead & Button magazine came out with a project done in spiral herringbone (as well as an ad for, ahem, BeadEnCounter software). It's basically a herringbone rope done with varying sizes of beads, from 15/0 to 8/0 and drop beads at the outer edge. Like peyote spirals, these varying sizes of beads make the rope bend as you work. 

Spiral herringbone
Well, the project is supposed to make a long spiral that is then interconnected with some strung segments. Very cute, but once I got the spiral going, I realized that it would be very easy to turn into a circle. And I didn't have the patience at that moment to continue on. So here are the earrings I created with my test pieces. Very very easy to do, and quick to work up. I think the second one only took me half an hour or so. 

At some point I may return to the technique and do the actual spiral. Herringbone isn't my favorite but I'm getting to know it better.  

Right now, though, I'm scheming to find other artists to trade with. Who will love my work enough to trade with me?


Monday, May 23, 2011

A Couple of Firsts, Tutorials and Software and Freeform Peyote!

Yes, the previous two posts were sent from my software in development, BeadEnCounter Beading Inventory software.   One of its features is the ability to send a post to either Facebook or a Blogger blog using the secret emails from each of those services.

The software is looking good, nearly in beta form. If any of you reading this (I do have several readers, I hope, after weeks of neglect) wish to participate in the beta stage of development, please email me at beadencounter@gmail.com.  I need testers who use Mac or PC, as the software will work on both.

Participation means receiving a guaranteed-buggy pre-shipping version of the software. I'll ask you to test the functioning of the various areas of the software, where data on your beading inventory, your finished work, and your seed-bead collection is stored. We'll also be testing functions like backing up and upgrading the files, which are necessary to take care of your data once it's entered.

Then you have to tell me in great detail what goes wrong. ;) This is the fun part, because so often the software you use is developed by faceless programmers on another planet. At least they might as well be, for all the feedback you can really give. At least this time, your pain will be heard, corrections will be made, and the final product will be that much better for your contributions.

Not to mention you'll get free software when the product does ship.

I could ship the software without a beta phase, but that's a very Microsoftian thing to do, expecting the first adopters to serve as beta testers. I hope not to do that.

--
In other news, I have listed on Etsy my first beading tutorial, Netted Rope and Netted Loop Variation. This stitch just came to me while I was working on a netted rope bracelet. It seems to be original, at least I've never seen anything like it. It's easy and lends itself to a zillion different adaptations.  I think of new ones all the time.  Pictured is one of the bracelets made with the variation. 

Even working up a seemingly-simple document like a tutorial took an unimaginable amount of work. I had a very kind beader offer to be first reader, and she worked enough of the pattern to point out all sorts of places where explanations were unclear, or pictures not explanatory enough. I had to nearly rewrite the whole thing, because she was right, in almost every particular. Someone once said that writing was the universe's way of teaching you how fuzzy your thinking is. I concur. Just when you think you've made everything plain, you haven't.

But the tutorial is much better now for the assistance of the first beader...er, reader.
--

Last, but not least, my freeform peyote piece is done. I think. I'm still deciding if I want to embellish more. Pictures tomorrow, I hope. I'm stopping now to go and bead. You do the same!

Sunday, April 24, 2011

Freeform Peyote


Why didn't anyone tell me! 


I'm starting my first free-form peyote stitch piece and I think I'm having the most fun I've had since I started beading! Yes, yes, YES! This is what I've been looking for.

Now to not screw it up. Because it's got real possibilities. The picture of the grapes has been hanging around on my desktop for ages, and it's the color inspiration for the piece. Some randomly shaped but highly polished ametrine nuggets will be incorporated.

 I even went out and learned how to do odd-count peyote. I can't wait to see what's next!

Monday, April 4, 2011

Peanutty Goodness

I got a few of these nifty new peanut beads, in the 3-4mm size. Just one tube, as I wanted to see what I could do with them.

So first I made a small sample of netted rope, using the peanuts as the larger inside beads. The gold beads are 15/0 metallic seed beads.

Peanut beads have the unique property of orienting themselves the way they darn well feel like. At least that's what it semms like. In the netted rope, they naturally orient themselves with one end inside, and the other poking a little bit out of the netting. Sometimes they get turned and trapped entirely inside the netting, so you have to encourage them to orient properly. It adds a bit of texture to the rope that I like, but it also eats beads like mad. A whole necklace of this rope would be wonderful, but it'd take 100 grams of the peanuts and really all you can see is one end of them.  It almost defeats the purpose of the peanuts.

So probably not something I'll pursue any time soon. 

Next, I tried my old favorite, peyote stitch. I strung 12 peanuts to start with, and originally wondered how the heck I was going to find the proper bead to go through since at first each row seemed like chaos.  But after a bit I realized that peyote with peanuts (sounds like a band, doesn't it "Peyote With Peanuts!"?) was nearly as simple as peyote with round beads.

The next bead to go through just naturally seems to present itself. Each peanut nests down just like the single round beads do.  The biggest difference seems to be that because there's more space in the matrix than with round beads, the tension on the thread is difficult to maintain and the beads tend to loosen as you work. I found that as I started each row, if I moved my needle down to the previous row's thread and made a half-hitch through that, then started the stitching for the new row, it was much easier to maintain control and prevent that annoying loose-bead feeling.


What you end up with is an apparently "double-sided" peyote piece. I didn't do enough to see how flexible it is in longer lengths. I suspect it will be far stiffer than single-bead peyote, and so probably not suitable for bracelets or neck straps.  Here is a picture taken from the side so you can see how the top edge looks, and another taken from the top edge down along the surface.

Even just stringing peanuts together gives a very nice textured appearance. Next I think I'll try some regular netting with peanuts as the intersection beads. I'll post pictures when I do!

Every Stitch Teaches a Lesson

Sometimes, not the lesson you might expect. 

I finished this bracelet a few days ago.   I finally found something to do with those brick-red lentils, which are the oddly drilled ones that overlap when they are strung. I could not think of what do to with them and they've languished so long in my stash I didn't think I would ever figure it out.  I have some black lentils like this too. 

So the first lesson this piece taught me was that keeping something in mind, just running across it as I shifted it aside searching for other beads, would eventually lead me to incorporating it into a piece. It's a good reason to thoroughly review my entire holdings every few months.

The picasso-finish seed beads I bought from a vendor on Etsy. I don't know how she did it, but her pictures made those beads look scrumptiously good. Amazing even. Somehow that brown baked-on finish seemed so exotic and made me spend an unseemly amount of money on seed beads. Then I got them and ummmm. Not so scrumptious in person. Not bad enough to make me send them back, but definitely disillusioning. So the second lesson was that not everything looks as good in person as it does online. Those of you considering internet dating ought to take note.

I grabbed those picassos (a mix called 'salsa,' though if my salsa came out looking like that I'd throw it out and start over) and started a peyote stitch. I discovered that many of the seed beads were of extremely variable size. Some were fat, others thin, some smaller, some larger in diameter. It rapidly became unpleasant and the work itself wasn't all that straight as I worked. Just fractions of a millimeter made so much difference!

Obviously the picasso-finisher, whoever they were, started with sub-standard beads. So my third lesson was that quality in materials matters. Bigtime. The extra work involved in working rows unevenly, having holes that are not of uniform diameter, and having to throw away significant numbers that are so far off-size as to be non-functional made the beads even more expensive than the price I paid.  It also made me appreciate my Miyuke and Toho beads that are so precise. Boy do they make beading easier!

I didn't really like the beads when I started the bracelet. I didn't like them more as time went on and the bracelet grew. Once finished, though, and with the addition of the double-picots and the lentils along the edges, I found that while I personally would never buy or wear such a bracelet, I could see that someone else with different taste might find it acceptable. Attractive, even.  My fourth lesson was that I enjoy working more on something I want to wear myself, but that isn't a mandatory element in creating something I'm proud of. 

The bracelet looks one way when it's all laid out neatly and the lentils groomed into place for the pictures. It looks quite another when it's on a wrist. The lentils flop and clack and shift the weight of the piece in interesting ways.  It feels a lot better than it looks, at least in my opinion.

Once a long time ago, I made a "texture quilt" for my son, out of fabrics like silks, satins, velvets and wool, designed to be felt with eyes closed. I'd read about them being made for blind people, and thought it was a great way to teach my son about textures. Uglier than all-get-out, because I didn't care about color or shape, or all those wrinkles and folds. I wonder if there's equivalent jewelry for the blind, where the feel of the piece is far more important than the visual esthetics?  Perhaps the last lesson this bracelet will teach me is that there's a market for everything, if you can find it.

Saturday, March 26, 2011

Dichroic Seed Beads, How Best to Use Them?

Two blog posts in two days! It's not like I'm not busy with other things.

In fact, right now I'm procrastinating on paying the bills, both business and personal. It needs to be done, but I just don't want to do it right now. Or, I could do some client work I promised this weekend...

Nah. Blogging instead.

I first laid eyes on dichroic seed beads at the last Pasadena Bead Show.  I think it was Judy Walker's booth, and she'd worked up the beads into some beaded peyote cylinder beads.  I was really taken with the sparkle and shine of the dichro beads in mass, but appalled at the cost. They sell these in tiny little 1 gram vials, somewhat like crack cocaine. Actually very like, in cost and addictive potential!

Judy had marked the beads up significantly, but I couldn't help myself and bought 1 vial of the clear "warm" colors and 1 of the dark emerald.  They are available for much less on the website, but even then, they're more than $7 a gram unless you buy a lot of grams. Now remember, most seed beads are packaged in 10 gram to 30 gram tubes or bags. Ten grams would be $70+ for dichroic beads. 

Judy briefly described the process, so I can see why they cost so much. Starting with Aiko precision delicas, which cost about twice as much as regular delicas to begin with, the beads are strung individually on thread or wire, then stretched across embroidery hoops of some sort for introduction to the coating furnaces. I was trying to figure out how they keep each bead separate so the edges get coated and blanked on that one.  I have no idea how much the coating process costs, but I'm sure it's not cheap. Most of us know how much dichroic glass costs in comparison with regular fusing glass. 

Then they have to inspect and repackage the beads. I have no idea how many fail the coating process. You only get about 180 beads to a gram, so the cautions on the website about using them sparingly are well-taken.  No matter how much you'd just like to use them in big blocks, it's unlikely that anyone is going to fork out hundreds of dollars for the amount needed for a large piece.


Then one day I was wandering through a bead store and...oh look! Some seed beads marked down to half-price. Oooh, shiny! I saw these pink/red size 6/0 beads with an iridescent AB finish, kind of beat up and a little scuffed at the same time. I'm not generally a pink person, but these appealed to me. In fact, when I picked them up, they told me what they wanted to be. It happens that way sometimes. I saw the finished bracelet in my head, complete with little fringes all over it.  Judy had recommended that as a use of the beads, as the tips of fringes. 


So I peyote-stitched the base of the bracelet. I love 6/0, they work up so fast!  Once I started doing the fringes in 15/0, I thought to myself, "It looks like the sea floor with little corals growing out of it. My husband also mentioned the aquatic resemblance.  At the tip of each branch of the fringe, I put one of my precious clear warm color dichroics.  This 8 inch bracelet took the better part of a gram, I think I have 20 of those beads left.  I don't know, at this point, if I really think the dichro beads are actually that much of an addition over regular silver-lined or AB finish beads. Do they really make a difference?  Photographing them is very difficult, remember.

I think that actually, spreading them out individually doesn't really show them to best advantage. It dilutes the dichroic effect too much. It doesn't give as much sparkle as you'd think. Perhaps it's just because they're against a background of other AB finish beads. I needed something with more contrast.

So I found some other dichro beads at Beads Beads while shopping for the elusive coral color match (see the previous post). They weren't as cheap (relatively speaking) as on the website, but not as high as show prices either. I bought 2 tubes of the red. I wanted to test them contrasted with some very simple background. I dug out some 11/0 shiny black beads and started working.  I'm using the red color of dichro beads. This was the result.

I found myself turning and flashing the band as I worked. The beads looked marvelous! Of course, I can see anyone wearing this doing the same. Warning! Don't wear it to work, you'd never get anything done!  Also, not while driving. "Sorry, officer, I was just, ummmm, looking at my bracelet."  !!

As I worked, though, I found that since the dichro beads are cylinders, and my black beads were round, the difference in size and shape made the piece ripple. But I did enough that I could see what was happening with the stripe of dichro.  It was amazing. 

Then I took pictures, which I think show well enough how the high-contrast really enhances the dichro beads. I decided that I need to find and buy some 11/0 delicas in matte black. Even the shiny black detracts a little bit from the contrast. I want those dichro beads to POP!

Then I ripped it up and salvaged all the beads for my next try. Nothing wasted but some thread. My time I consider well invested in this test. 

Friday, March 25, 2011

Why Local Bead Stores Must Never Die


Mom's Christmas present
So, my lovely mother calls me from Florida. She's all perky with good news. She was wearing the bracelet I gave her for Christmas while shopping and the shopkeeper just loved it.

So much so, she asked my mom about it, and my mother tells her that I made it. The woman asks what it would cost to have me make her one. My mom quotes a totally whacked out price, way higher than what I would price it on Etsy, or what I told my mom it would cost to make earlier. It's just seed beads, for crying out loud!

Very smug in her twin-set,
isn't she?
But the woman said okay to this outrageous price! Then the only direction she gave was she wanted it in black beads with coral.  No size given, just "like what you made me will be okay,"  my mom says.

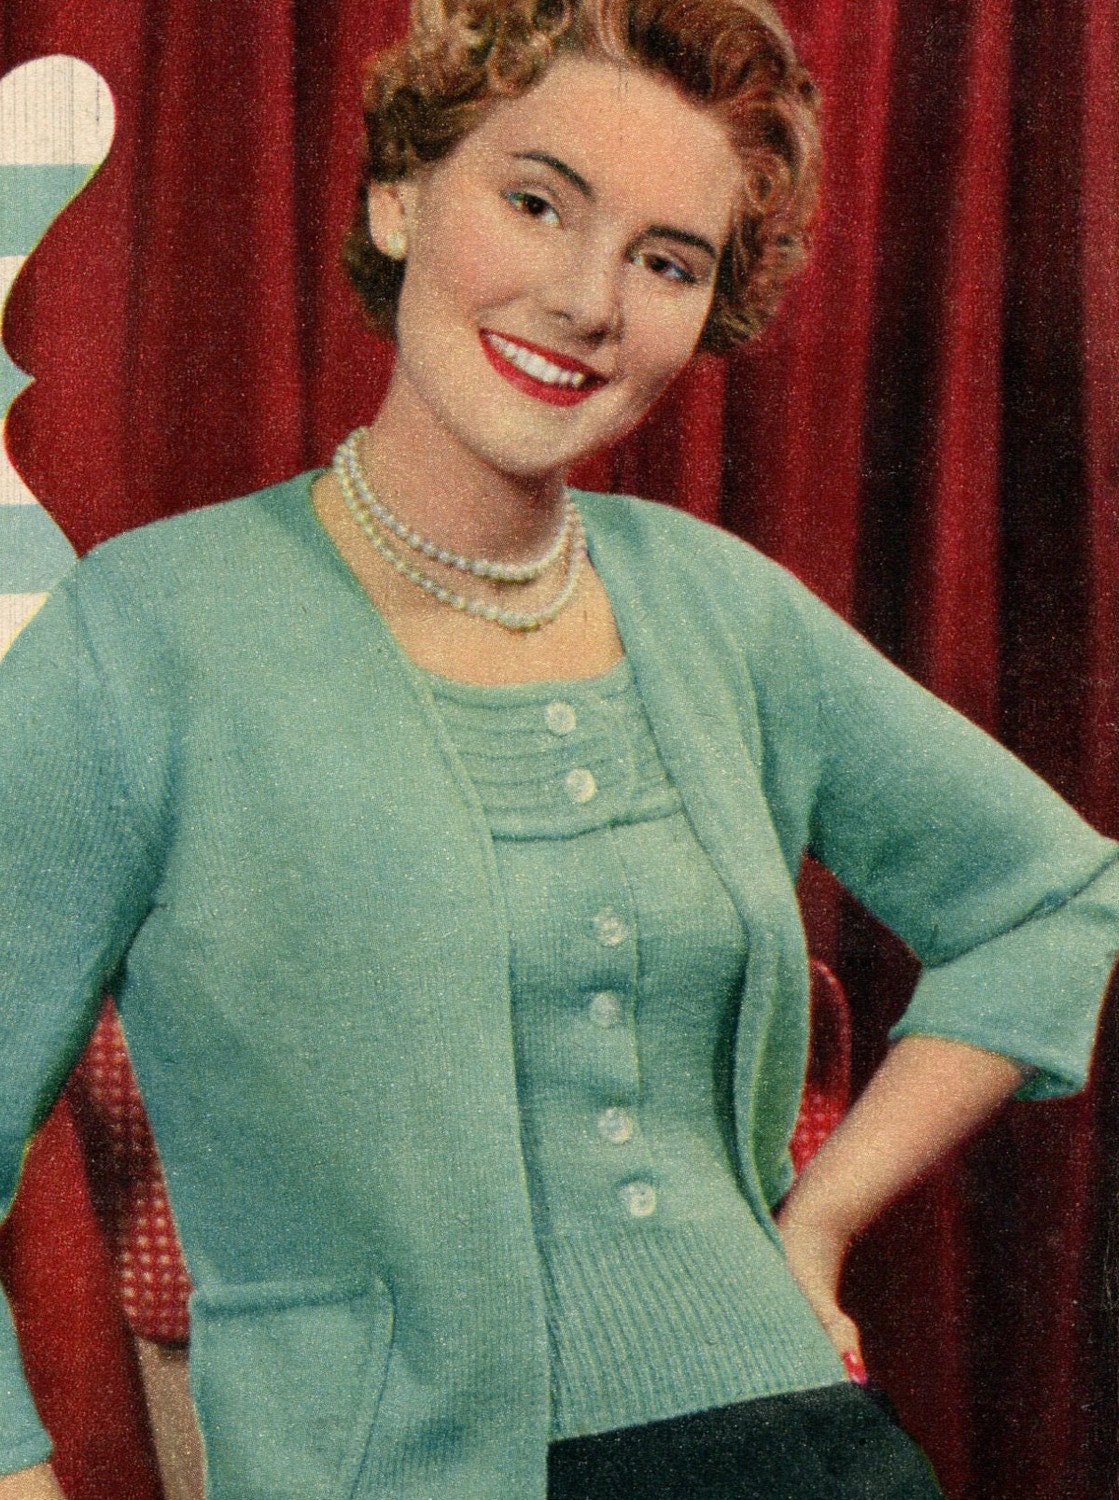
Now, when someone says "coral" what color do you think of?  I tend to think of the vivid red of actual coral beads. But I know this isn't true of women of my mother's age. They tend to think of a pinky-red (or reddish-pink) featured in twin-sets.  You know, those cardigan and shell sweater thingies women wore in the 50's.  Like this vintage knitting pattern pictured, available from an Etsy shop.

Classic coral?
Like this dress. That color coral.  Sortof. Do you have any idea how many colors of reddish pink, pinkish red, orangishpinkyred and assorted things very close to that there are in beads??? I'll tell, you. Zillions. Officially.

But of course, I don't have anything remotely close to classic coral color in my stash. I have bright pink. Pale pink. A dozen reds. Orange of various violent hues. No coral. How horrible. I will have to visit a bead store. I am desolate! 

I managed to find something close in size 11/0 at the first store I went to.  Something that I thought said "coral" in the classic sense, and was pretty and sparkly. Now I just need to match that with some 15s or Delicas in the same color. This is where things got a bit touchy.

The wrong stuff, not even close
I did find some 15s at the first store that looked close while in the store. Not so when I got them home and did a test run. Way too light. This is the wrong, unmatching tube of beads.  What was I thinking?

So, dolefully, I dragged myself to another store the following weekend, despite the fact it was raining cats & dogs. The things I do for my mother!

Yes, it's a match!
This is the wonderful Beads, Beads store in Orange, CA. They are among my favorite stores, not least for the fact that the staff will help you endlessly. They have a huge selection, but most of it is in the back room, with just samples out front. But so far I've never come out of there not finding something I truly needed.  So I got my coral-pink, in a delica.

This is where the local bead stores never dying comes in. I could have shopped and ordered seventeen times from online sources and never gotten a match.  I order beads all the time off the web, and have some wonderful sources. But in the specific instance of having to match an exact shade, there is no substitute for seeing and touching the beads yourself. You can't do that online.

Support your local shop when you can, because if we don't, when we really need them for hands-on, they won't be there.

You'll never guess.
And another thing you can't really do well online is discover new, cool colors. Yeah, they can list and describe them, but even expert pictures can't really convey the niftiness of certain colors. This picture is of something I ran across while searching diligently for coral. Can you guess the color???

It's not a great picture, but then, it's impossible to photograph the tiny transparent rim against the color-lined interior, that gives a mysterious conglomeration of sparkle and shimmer. Give up? It's olivine-lined orange. I can't even properly describe it in words, but the effect is wonderful. I can't wait to work it into something.  Stumbling across great new stuff also requires in-person presence. You can only get that in a bead store.

Coral in its glory
 So I did finally finish the coral/black bracelet. Here it is.  I'll mail it off tomorrow to Florida and see if her shopkeeperness likes it. If not, no sweat. I came up with a new technique for the magnetic clasp, to conceal it inside a tube of peyote stitch. Works great.

Nifty clasp
And I'm putting together a tutorial on the variation of the netted rope I came up with. I haven't seen this anywhere else. I took pictures as I worked and I'll also get some diagrams going. That ought to be fun.

Wednesday, February 2, 2011

Meanwhile, Back At The Ranch

I have managed to do a few other pieces in between bouts of frustration.

This one in particular I love. The translucent AB finish on the bugles gives a shimmer to the bracelet that is lovely. I happened to have some size 15s in the same color and finish, and used them to construct my first button-hole and button closure. It works really well, surprisingly. I used a vintage mirrored bead turned upside down as the button, since the mirrored back had the same shimmer as the beads.

I haven't seen anyone use small bugles for peyote work, but it's just like two-drop peyote, only with fewer beads to pick up. It creates a very nice "hand" to the piece, as it's wonderfully flexible across the length, it folds and feels almost like fabric.

The bugles, though are not as consistent in size as round beads, so you have to be on watch for overly long or short beads, and pull the work tight to maintain tension and sizing. Otherwise the edges wobble. Even though the difference between the bead lengths may be less than half a millimeter, it does become obvious in such precise work. 

Because I was having such a good time doing the peyote, the length got away from me a little bit. It's sized for a larger wrist, or would actually look good around a black silk opera glove.  Anyone planning on attending the opera soon, dressed to the nines?

Right now, I'm working on a bugle peyote necklace with the blue/plum raku beads, and a raku pendant from Xaz Beads I found at the Pasadena Bead Show.  The peyote is very soothing after beating my head against the wall

Tuesday, February 1, 2011

Unbeading, or Two Steps Forward, Two Back

Struggling. That's how I feel about this bead project. I've been struggling from the beginning.

Let's face it. I'm so impressed by the winning competitor of each Etsy Beadweavers Team challenge. So, after December, in which I got a big Two Countem' TWO votes for my entry, I determined I was going to pull out all the stops for the next challenge in February. My goal was modest...to get more than two votes. 

Come to find out, many people recruit votes for themselves on Facebook and other social media. That's cool, because it drives more traffic to all of our Etsy stores. My stats certainly went up. 

And the winning pieces are always incredible. In the spirit of elevating my own work, I was going for nearly-incredible. I'd had this idea in mind for a long while, but not the whole integrated piece. Bits of it. The netted rope. The netting on the forest green ultrasuede background. The donut was a late addition, but it really sparked a whole lot of the design. I was planning to cut around the donut and suspend it from the peyote straps, not touching the embroidered piece elsewhere. I could hardly wait to move on to the fringe I had planned for the bottom. It was gonna be spectacular.  

But, that part about integration is not negligible. How to connect Tab A and Slot B can be problematic. Netted rope with an embroidered piece hanging off it? How does that connection work? How do you sew netting onto a base fabric? I thought that would be easy enough. Netting isn't hard. Bead embroidery isn't hard. Separately, they're cake. 

Holy crap getting one onto the other is HARD!!!  The pictures here are of my fifth attempt. That's right, five times I started and got a fair way into it before I gave up, tore it all out, and salvaged the beads.  

Drawing straight lines and trying to bead along them didn't work. Anchoring each vertex bead in the netting down as I went didn't work. Then I made a square piece of netting, sewed that down in the center and tried to work outward from there. That was slightly more successful, but then I got to the outer corners. Fitting netting into curves is no fun. In fact, it started to look worse the farther up the curve I went. 
These pictures were taken right before I got out my scissors, cut off all that netting, and excised the two cabochons into separate pieces, just so I wouldn't be tempted to make a sixth attempt at something that is clearly not meant to be, or at least not at my current level of expertise.

I still don't have any firm idea of how to attach the bit with the cabochons to the netted rope. I don't have a clue as to what's going around the neck.  This one is going to have to lie fallow for a bit.

I hate unbeading. 

This will teach me not to have a fairly substantial concept of where I'm going before I start. The entire project doesn't have to be planned to the last detail, and things will certainly evolve as I work, they always do. But no more of these "oh just do the bits and it'll all fall together." Because what will happen is that I'll spend a lot of time learning the sad lessons of unbeading, and getting no farther forward.

So there won't be an entry from me in February. Of course, if I did enter anything, it would be titled "Queen of the Fat Chance" after seeing this entry.   Perhaps "Our Lady of No Way In Hell."

Tuesday, January 4, 2011

Bead or Blog....Blog or Bead?

I'm sure every blogging beader has the same conundrum.

I'm happier while beading than I am while blogging. Particularly since prepping for a blog post means taking and editing my photos, and preparing them for uploading. And it just doesn't seem like a blog anymore without a few photos! Why is that, I wonder?  I used to be able to just yammer on about feelings or hopes and fears or, well, crap, without the need for photos rearing it's ugly head.

Time is the commodity we all have the least of. Except for teenagers, who are immortal, and thus don't feel that spending their youth courting carpal tunnel of the thumbs while texting is a waste.  I feel like I'd rather spend my valuable time where it makes me happiest.

So my blog-productivity (blogitivity? productbloggity?) is down somewhat. But on the other hand, I really like sharing my work. I like the support I get from other beaders and readers. I like the suggestions that come along when I pose a question or have a knotty problem. And beaders always have knotty problems. If ya' know what I mean.  

So there are benefits to blogging that I don't want to forego, and I know that if I want to keep readers coming back, I can't just let this blog lapse for months at a time like so many do. I can't tell you how many blogs I've stumbled across at random where the last post was in July (2009), and that one says, "Oh, I haven't posted for months but now I'm going to be posting every day..."  Yeah. Right.  

Fresh and interesting content keeps people coming around. People who will show me their stuff if I show them mine. So, we're back to photos, aren't we?

I've been struggling endlessly with my camera. I couldn't get reproducible results from one photo to another. I got the darn thing repaired (thank you, Canon USA). I couldn't believe that it wasn't easier to take a simple photo.  Online I found a recommendation that for a camera to take good jewelry photos it needs to have a Macro setting, and a white balance adjustment. My camera has those.  Why doesn't it work for me?

So I returned to state zero on my camera. I wiped out all the custom settings I'd been trying, and read the darn manual. One more time. Whattaya know?  There it is on the Macro page, when I click the little flower button, it will take pictures as close as 2 inches, or 9 inches when zoomed. Though it seems like their measurement isn't to the lens, it's the back of the camera, really.  It will focus itself. Stop struggling, Lynn. Just let the zen of the camera take over....be the picture. 

And it worked. Finally. Closeups that are beautiful, and look like the object being photographed. I had to do minimal correction of the photos in editing software. Cropping, adjusting high/lowlights, and saving in the right format. I think I only used sharpening on one photo in the whole batch!

These pictures are of my most recent piece. It's a bracelet done with a peyote strap, in size 15, yes, 15 beads. I love the "fabric" of beads this creates, so supple and with a surface of glowing depth. Then I used a ruffled netting along each edge, with 3mm Magatamas in purple to highlight the edge. 

I used a slide bar clasp in sterling, and the large beads in the fringy embellishment are flourite rounds, 12mm. I love those. This bracelet came out exactly as I wanted it to. Can you see the subtle variation in the beads on the strap? There are patterns there which, when you hold the bracelet under the light and move it, are more obvious than in the pictures. I accomplished this by using two color codes of 15s, right next to each other, Artbeads Toho 506 and 507, one of which is more blue/green/purple, and the other more green/yellow. Lovely.  I hope you can see that pattern in the pictures.

I auditioned several different methods of embellishing around the clasp, most of which didn't work. This clump of Magatamas with the flourite coming out of it is great. The larger beads flop about and clack together, so you get sound as well as sight and tactile enjoyment of the bracelet.

This piece is a variation of the last bracelet I finished, using some metallic finish size 8 delicas in what the seller called a "rain" mix. Didn't look like rain to me, but it looked nice. I made my own hook and loop closures for this one...it's only marginally successful. But as an inspiration to move into a variation that was so successful, I forgive it for not being perfect.  Sort of. Maybe I'll give it to someone I don't really like. Or convince someone to adopt it because it's so pitiful. 

In any case, with some adjustments in lighting and staging, I think I can move along in my quest for better photos now. I know it's not the camera. I probably shouldn't be taking all my pictures on a ratty beading matt with thread clippings on it, either. I have a lovely set up in the other room. 

Now I can move on to agonizing over why I don't have any Etsy sales.

Sunday, December 26, 2010

Adios to Christmas Gifts

Now I can put up photos of gifts that went out this year. I've been waiting, because I have a question about the last one.  Reading a post about the gift you're being given is the modern digital equivalent of finding your packages hidden in your mother's closet and very carefulllllly peeling off the tape to see if you can get a peek. Not that I ever did that. Mom. Really. Never.

I was amazed that these first two fit their recipients so well. My husband and son were chivvying me that they were way too small. Ha! They fit perfectly. So there. 

I made a simple peyote stitch cuff for my niece. The size 6 blue/plum beads worked up quickly, and then it cried out for some gold edging. I happened to have some huge 16mm glass beads in almost exactly the same iridescent color, so they became the double buttons. I have found I intensely dislike working with elastic thread, but sometimes, ya just gotta. I had some smaller beads in a matching tone, and did the loops in those, with elastic. Apparently I like this color, because I have a lot of it, in a lot of sizes.

The cuff looked totally elegant on the Niece's wrist. Much better than just this photo could express, actually.   I struggled with the elastic loops, though. If anyone has a hint or two on beading with elastic, especially the knotting and making it stay knotted part, I'd appreciate the help. Honestly, what a hassle!

Next, a gift for the Niece's mother, my sister-in-law. She is a tiny person, and so a bracelet that worked up to fit a tiny wrist. This started with the small netted rope portions, and then I came up with a way to join them, using lustered black/green triangle beads. So the bracelet is flexible enough to bend well, and somehow she wore an outfit on Christmas day that matched the bracelet perfectly. She does love earth tones. 

I sent my sister the hematite netted rope bracelet I'd done a while ago.  I haven't heard from her yet if it arrived in time. I hope so.

No, it's not all bracelets all the time. I sent my dad this ornament. I'd begun it a while ago, but didn't get the inspiration to finish it until last week. I dug out the green dyed shell spear beads, and fringed them around the bottom. This was another use of the dreaded elastic. I made the bottom of the edging from elastic thread so that it will slip on and off any 4 inch glass ornament. If it arrived broken, it wouldn't be a tragedy, or require re-sewing to get it on another ornament. Fortunately, it arrived intact and my dad called to say they loved it, and had hung it in their lanai. Overlooking the alligator pond. In Florida. We can't all have white Christmases.

It was incredibly difficult to get the photo of the ornament. I took 18 pictures, and only this one was anywhere near focused. And it's not perfect. The shiny surface of the bulb got in the way, not to mention you can actually see me taking the picture in the reflection!  And I didn't clear out the work area to take the photo. I was a bit rushed getting it all ready to ship.  My camera is still making me crazy. 

But yes, the last one was a bracelet, for my mom. This too is netted rope. I wanted to try some smaller beads to net, so I used the same size 6 blue/plum beads that were used in the Niece's cuff. 

Netting such small beads (also beads that weren't perfectly spherical) made a little bit of a lumpy piece. These seed beads don't nest together the same way spherical beads do. The lemon-lime netting was fun, though.

Now for the question. In my limited experience, I haven't seen anyone link together sections of netted rope with exactly this technique. Has anyone else? It's an adaptation of the netting stitch, and lends itself to a lot of variations. Would a tutorial be interesting to anyone? I'm not going to bother if everyone says, "oh yeah, I've seen that lots of times."  I liked doing it because it allows the use of the netted rope without having to have zillions of the larger beads and making the same solid rope every time.  I used the same inter-connecting technique on the sister-in-law bracelet above, so you can see that it works up in many different ways.

I guess this is an extension of the discussion on the Etsy Beadweaver's list lately on inspiration, plagiarism, and original design. Is something you think you invented really original? How do you know without extensive research??

Any thoughts on the matter are much appreciated.